The Control Properties
Before writing an event
procedure for the control a to
response to a user's
input, you have to set certain properties for the control to determine
its appearance and how it will work with the event procedure. You can set the properties of the controls in the properties
window or at runtime.
have to set certain properties for the control to determine
its appearance and how it will work with the event procedure. You can set the properties of the controls in the properties
window or at runtime.
Figure 3.1 on the right is a typical
properties window for a form. You can rename the form caption to any name that you like best. In the properties window, the
item appears at the top part is the object currently selected (in Figure 3.1, the object selected is Form1). At the bottom
part, the items listed in the left column represent the names of various properties associated with the selected object while
the items listed in the right column represent the states of the properties. Properties can be set by highlighting the items
in the right column then change them by typing or selecting the options available. For example, in order to change the caption,
just highlight Form1 under the name Caption and change it to other names. You may also try to alter the appearance of the
form by setting it to 3D or flat. Other things you can do are to change its foreground and background color, change the font
type and font size, enable or disable minimize and maximize buttons and etc.
You can also change the properties at runtime to
give special effects such as change of color, shape, animation effect and so on. For example the following code will
change the form color to red every time the form is loaded. VB uses hexadecimal system to represent the color. You can
check the color codes in the properties windows which are showed up under ForeColor and BackColor .
Private Sub Form_Load()
Form1.Show
Form1.BackColor
= &H000000FF&
End Sub
Another example is to change the control Shape
to a particular shape at runtime by writing the following code. This code will change the shape to a circle at runtime. Later
you will learn how to change the shapes randomly by using the RND function.
Private Sub Form_Load()
Shape1.Shape = 3
End
Sub
I
would like to stress that knowing how and when to set the objects' properties is very important as it can help you to write
a good program or you may fail to write a good program. So, I advice you to spend a lot of time playing with the objects'
properties.
I am not going into the details on how to set the
properties. However, I would like to stress a few important points about setting up the properties.
- You should set the Caption Property
of a control clearly so that a user knows what to do with that command. For example, in the calculator program, all the
captions of the command buttons such as +, - , MC, MR are commonly found in an ordinary calculator, a user should have no
problem in manipulating the buttons.
- A lot of programmers
like to use a meaningful name for the Name Property may be because it is easier for them to write and read the event
procedure and easier to debug or modify the programs later. However, it is not a must to do that as long as you label your
objects clearly and use comments in the program whenever you feel necessary. T
- One more important
property is whether the control is enabled or not.
- Finally, you must
also considering making the control visible or invisible at runtime, or when should it become visible or invisible.
3.2 Handling some of the common
controls
3.2.1 The Text Box
The text box is the standard control
that is used to receive input from the user as well as to display the output. It can handle string (text) and numeric data
but not images or pictures. String in a text box can be converted to a numeric data by using the function Val(text). The following
example illustrates a simple program that processes the inputs from the user.
Example 3.1
In this program, two text boxes
are inserted into the form together with a few labels. The two text boxes are used to accept inputs from the user and one
of the labels will be used to display the sum of two numbers that are entered into the two text boxes. Besides, a command
button is also programmed to calculate the sum of the two numbers using the plus operator. The program use creates a variable
sum to accept the summation of values from text box 1 and text box 2.The procedure to calculate and to display the output
on the label is shown below. The output is shown in Figure 3.2
Private Sub Command1_Click()
‘To
add the values in text box 1 and text box 2
Sum = Val(Text1.Text) + Val(Text2.Text)
‘To
display the answer on label 1
Label1.Caption = Sum
End Sub
Figure 3.2

3.2.2 The Label
The label is a very useful control
for Visual Basic, as it is not only used to provide instructions and guides to the users, it can also be used to display outputs.
One of its most important properties is Caption. Using the syntax label.Caption, it can display text and numeric data . You
can change its caption in the properties window and also at runtime. Please refer to Example 3.1 and Figure 3.1 for
the usage of label.
3.2.3 The Command Button
The command button is a very important
control as it is used to execute commands. It displays an illusion that the button is pressed when the user click on it. The
most common event associated with the command button is the Click event, and the syntax for the procedure is
Private Sub
Command1_Click ()
Statements
End Sub
3.2.4 The Picture Box
The Picture Box is one of the controls
that used to handle graphics. You can load a picture at design phase by clicking on the picture item in the properties window
and select the picture from the selected folder. You can also load the picture at runtime using the LoadPicture method. For
example, the statement will load the picture grape.gif into the picture box.
Picture1.Picture=LoadPicture
("C:\VB program\Images\grape.gif")
You will learn more about the picture
box in future lessons. The image in the picture box is not resizable.
3.2.5 The Image Box
The Image Box is another control
that handles images and pictures. It functions almost identically to the picture box. However, there is one major difference,
the image in an Image Box is stretchable, which means it can be resized. This feature is not available in the Picture Box.
Similar to the Picture Box, it can also use the LoadPicture method to load the picture. For example, the statement loads the
picture grape.gif into the image box.
Image1.Picture=LoadPicture
("C:\VB program\Images\grape.gif")
3.2.6 The List Box
The function of the List Box is
to present a list of items where the user can click and select the items from the list. In order to add items to the list,
we can use the AddItem method. For example, if you wish to add a number of items to list box 1, you can key in the following
statements
Example
3.2
Private Sub Form_Load ( )
List1.AddItem “Lesson1”
List1.AddItem “Lesson2”
List1.AddItem “Lesson3”
List1.AddItem “Lesson4”
End Sub
The items in the list box can be
identified by the ListIndex property, the value of the ListIndex for the first item is 0, the second item has a ListIndex
1, and the second item has a ListIndex 2 and so on
3.2.7 The Combo Box
The function of the Combo Box is
also to present a list of items where the user can click and select the items from the list. However, the user needs to click
on the small arrowhead on the right of the combo box to see the items which are presented in a drop-down list. In order to
add items to the list, you can also use the AddItem method. For example, if you wish to add a number of items to Combo box
1, you can key in the following statements
Example 3.3
Private Sub Form_Load ( )
Combo1.AddItem “Item1”
Combo1.AddItem “Item2”
Combo1.AddItem “Item3”
Combo1.AddItem “Item4”
End Sub
3.2.8 The Check Box
The Check Box control lets the
user to select or unselect an option. When the Check Box is checked, its value is set to 1 and when it is unchecked, the value
is set to 0. You can include the statements Check1.Value=1 to mark the Check Box and Check1.Value=0 unmark the Check
Box, and use them to initiate certain actions. For example, the program will change the background color of the form to red
when the check box is unchecked and it will change to blue when the check box is checked. You will learn about the conditional
statement If….Then….Elesif in later lesson. VbRed and vbBlue are color constants and BackColor is the background
color property of the form.
3.2.9 The Option Box
The Option Box control also lets
the user selects one of the choices. However, two or more Option Boxes must work together because as one of the Option Boxes
is selected, the other Option Boxes will be unselected. In fact, only one Option Box can be selected at one time. When an
option box is selected, its value is set to “True” and when it is unselected; its value is set to “False”.
In the following example, the shape control is placed in the form together with six Option Boxes. When the user clicks on
different option boxes, different shapes will appear. The values of the shape control are 0, 1, and 2,3,4,5 which will make
it appear as a rectangle, a square, an oval shape, a rounded rectangle and a rounded square respectively.
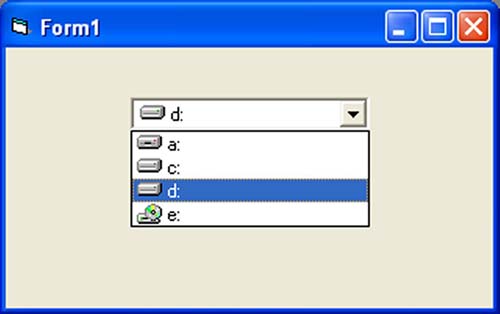
3.2.9 The Drive List Box
The Drive ListBox is used to display
a list of drives available in your computer. When you place this control into the form and run the program, you will be able
to select different drives from your computer as shown in Figure 3.3
Figure 3.3 The Drive List Box
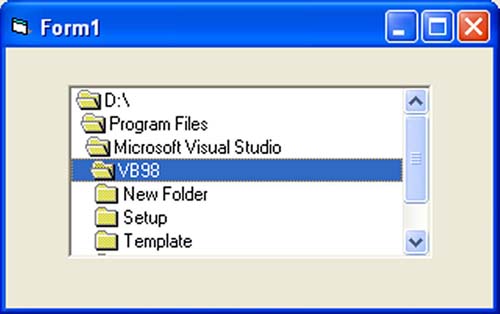
3.2.10 The Directory
List Box
The Directory List Box is used
to display the list of directories or folders in a selected drive. When you place this control into the form and run the program,
you will be able to select different directories from a selected drive in your computer as shown in Figure 3.4
Figure 3.4 The Directory List Box
3.2.11 The File List Box
The File List Box is used to display
the list of files in a selected directory or folder. When you place this control into the form and run the program, you will
be able to a list of files in a selected directory as shown in Figure 3.5
You can coordinate the Drive List
Box, the Directory List Box and the File List Box to search for the files you want. The procedure will be discussed in later
lessons.
|
Visual Basic allows a procedure to be repeated as many
times as long as the processor could support. This is generally called looping .
9.1 Do Loop
The format are
a) Do
While condition
Block of one or more VB statements
Loop
b) Do
Block of one or more VB statements
Loop While condition
c)
Do Until condition
Block of one or more
VB statements
Loop
d)
Do
Block of one or more VB statements
Loop Until condition
9.2 Exiting the Loop
Sometime we need exit to exit a loop prematurely because of a certain condition
is fulfilled. The syntax to use is known as Exit Do. Lets examine the folowing example
9.3 For....Next Loop
The format is:
For counter=startNumber
to endNumber (Step increment)
One or more VB statements
Next
Pease refer to example
9.3a,9.3b and 9.3 c
Sometimes the user might want to get out from the loop before the whole repetitive
process is executed, the command to use is Exit For. To exit a For….Next Loop, you can place the Exit For statement
within the loop; and it is normally used together with the If…..Then… statement. Let’s examine example 9.3
d.
|
Example 9.1
Do while counter <=1000
num.Text=counter
counter =counter+1
Loop
* The above example
will keep on adding until counter >1000.
The above example
can be rewritten as
Do
num.Text=counter
counter=counter+1
Loop until counter>1000
Example 9.2
Dim sum, n As Integer
Private Sub Form_Activate()
List1.AddItem "n" & vbTab & "sum"
Do
n = n + 1
Sum = Sum + n
List1.AddItem n & vbTab & Sum
If n = 100 Then
Exit Do
End If
Loop
End Sub
Explanation
In the above example, we find the summation of 1+2+3+4+……+100.
In the design stage, you need to insert a ListBox into the form for displaying the output, named List1. The program uses the
AddItem method to populate the ListBox. The statement List1.AddItem "n" & vbTab & "sum" will display the headings
in the ListBox, where it uses the vbTab function to create a space between the headings n and sum.
|
Example 9.3 a
For counter=1
to 10
display.Text=counter
Next
|
Example 9.3 b
For counter=1
to 1000 step 10
counter=counter+1
Next
|
|
Example 9.3 c
For
counter=1000 to 5 step -5
counter=counter-10
Next
*Notice that
increment can be negative
|
Example 9.3 d
Private Sub
Form_Activate( )
For n=1 to 10
If n>6 then
Exit For
End If
Else
Print n
End If
End Sub
| |