Networking with Internet (Visual Basic)

Visual Basic Working with Functions2
Home | About Me | Pieces Of Mhe | Circle of Friends | Visual Basic History | Visual Basic 6.0 | Visual BAsic Working with Controls | Visual Basic Working with Functions | Visual Basic Working with Functions2

 
In Lesson 19, you have learned how to create a simple database application using data control. In this lesson, you will work on the same application but use some slightly more advance commands. The data control support some methods that are useful in manipulating the database, for example, to move the pointer to a certain location. The following are some of the commands that you can use to move the pointer around:

data_navigator.RecordSet.MoveFirst                       ' Move to the first record

data_navigator.RecordSet.MoveLast                       ' Move to the last record

data_navigator.RecordSet.MoveNext                      ' Move to the next record

data_navigator.RecordSet.Previous                        ' Move to the first record

You can also add, save and delete records using the following commands:

data_navigator.RecordSet.AddNew                          ' Adds a new record

data_navigator.RecordSet.Update                           ' Updates and saves the new record

data_navigator.RecordSet.Delete                            ' Deletes a current record

*note: data_navigator is the name of data control

In the following example, you shall insert four commands and label them as First Record, Next Record, Previous Record and Last Record . They will be used to navigator around the database without using the data control. You still need to retain the same data control (from example in lesson 19) but set the property Visible to no so that users will not see the data control but use the button to browse through the database instead. Now, double-click  on the command button and key in the codes according to the labels.

Private Sub Command2_Click()
dtaBooks.Recordset.MoveFirst
End Sub


Private Sub Command1_Click()                     
dtaBooks.Recordset.MoveNext     
End Sub


Private Sub Command3_Click()
dtaBooks.Recordset.MovePrevious
End Sub

Private Sub Command4_Click()
dtaBooks.Recordset.MoveLast
End Sub

Run the application and you shall obtain the interface below and you will be able to browse the database using the four command buttons.


Creating VB database applications using ADO control


In Lesson 19 and Lesson 20, we have learned to build VB database applications using data control. However, data control is not a very flexible tool as it could work only with limited kinds of data and must work strictly in the Visual Basic environment. To overcome these limitations, we can use a much more powerful data control in VB known as  ADO control. ADO stands for ActiveX data objects. As ADO is ActiveX-based, it could work in different platforms (different computer systems) and different programming languages. Besides, it could access many different kinds of data such as data displayed in the Internet browsers, email text and even graphics other than the usual relational and non relational database information.

To be able to use ADO data control, you need to insert it into the toolbox. To do this, simply press Ctrl+T to open the components dialog box and select Microsoft ActiveX Data Control 6. After this, you can proceed to build your ADO-based VB database applications.

The following example will illustrate how to build a relatively powerful database application using ADO data control. First of all, name the new  form as frmBookTitle and change its caption to Book Tiles- ADO Application.  Secondly, insert the ADO data control and name it as adoBooks and change its caption to book. Next, insert the necessary labels, text boxes and command buttons. The runtime interface of this program is shown in the diagram below, it allows adding and deletion as well as updating and browsing of data.


The properties of all  the controls are listed as follow:
Form Name frmBookTitle
Form Caption Book Titles -ADOApplication
ADO Name adoBooks
Label1 Name lblApp
Label1 Caption Book Titles
Label 2 Name lblTitle
Label2 Caption Title :
Label3 Name lblYear
Label3 Caption Year Published:
Label4 Name lblISBN
Label4 Caption ISBN:
Labe5 Name lblPubID
Label5 Caption Publisher's ID:
Label6 Name lblSubject
Label6 Caption Subject :
TextBox1 Name txtitle
TextBox1 DataField Title
TextBox1 DataSource adoBooks
TextBox2 Name txtPub
TextBox2 DataField  Year Published
TextBox2 DataSource adoBooks
TextBox3 Name txtISBN
TextBox3 DataField ISBN
TextBox3 DataSource adoBooks
TextBox4 Name txtPubID
TextBox4 DataField  PubID
TextBox4 DataSource adoBooks
TextBox5 Name txtSubject
TextBox5 DataField  Subject
TextBox5 DataSource adoBooks
Command Button1 Name  cmdSave
Command Button1 Caption &Save
Command Button2 Name  cmdAdd
Command Button2 Caption &Add
Command Button3 Name  cmdDelete
Command Button3 Caption &Delete
Command Button4 Name  cmdCancel
Command Button4 Caption &Cancel
Command Button5 Name  cmdPrev
Command Button5 Caption &<
Command Button6 Name  cmdNext
Command Button6 Caption &>
Command Button7 Name  cmdExit
Command Button7 Caption E&xit

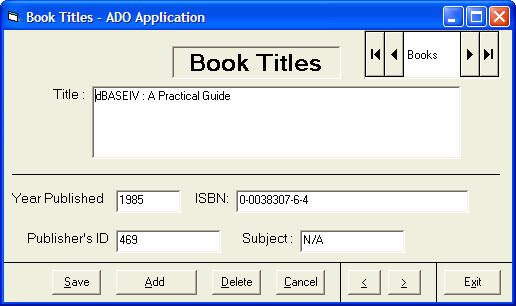
To be able to access and manage a database, you need to connect the ADO data control to a database file. We are going to use BIBLIO.MDB that comes with VB6. To connect ADO to this database file , follow the steps below:

a) Click on the ADO control on the form and open up the properties window.

b) Click on the ConnectionString property, the following dialog box will appear.

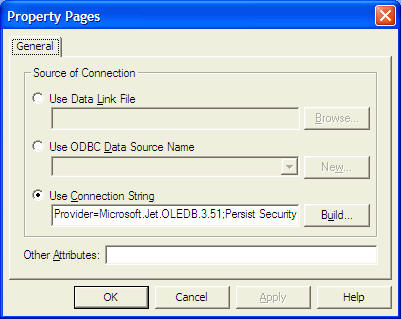
when the dialog box appear, select the Use Connection String's Option. Next, click build and at the Data Link dialog box, double-Click the option labeled Microsoft Jet 3.51 OLE DB provider.

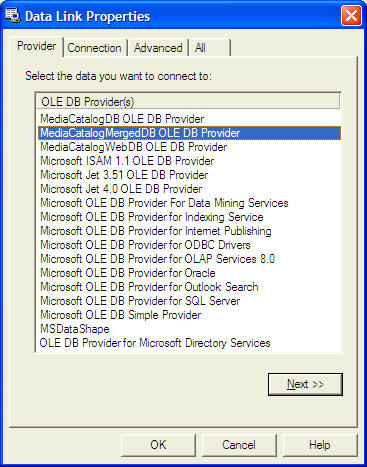
 After that, click the Next button to select the file BIBLO.MDB. You can click on Text Connection to ensure proper connection of the database file. Click OK to finish the connection.

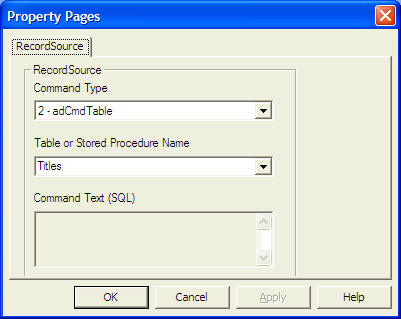
Finally, click on the RecordSource property and set the command type to adCmd Table and Table name to Titles. Now you are really to use the database file.

กก

Now, you need to write code for all the command buttons. After which, you can make the ADO control invisible.

กก

กก

For the Save button, the program codes are as follow:

Private Sub cmdSave_Click()
adoBooks.Recordset.Fields("Title") = txtTitle.Text
adoBooks.Recordset.Fields("Year Published") = txtPub.Text
adoBooks.Recordset.Fields("ISBN") = txtISBN.Text
adoBooks.Recordset.Fields("PubID") = txtPubID.Text
adoBooks.Recordset.Fields("Subject") = txtSubject.Text
adoBooks.Recordset.Update

End Sub

For the Add button, the program codes are as follow:

Private Sub cmdAdd_Click()
adoBooks.Recordset.AddNew
End Sub

For the Delete button, the program codes are as follow:

Private Sub cmdDelete_Click()
Confirm = MsgBox("Are you sure you want to delete this record?", vbYesNo, "Deletion Confirmation")
If Confirm = vbYes Then
adoBooks.Recordset.Delete
MsgBox "Record Deleted!", , "Message"
Else
MsgBox "Record Not Deleted!", , "Message"
End If

End Sub
กก

For the Cancel button, the program codes are as follow:

Private Sub cmdCancel_Click()
txtTitle.Text = ""
txtPub.Text = ""
txtPubID.Text = ""
txtISBN.Text = ""
txtSubject.Text = ""
End Sub

For the Previous (<) button, the program codes are

Private Sub cmdPrev_Click()
If Not adoBooks.Recordset.BOF Then
adoBooks.Recordset.MovePrevious
If adoBooks.Recordset.BOF Then
adoBooks.Recordset.MoveNext
End If
End If

End Sub

For the Next(>) button, the program codes are

Private Sub cmdNext_Click()
If Not adoBooks.Recordset.EOF Then
adoBooks.Recordset.MoveNext
If adoBooks.Recordset.EOF Then
adoBooks.Recordset.MovePrevious
End If
End If

End Sub

TextBox2 DataField  Year Published
TextBox2 DataSource adoBooks
TextBox3 Name txtISBN
TextBox3 DataField ISBN
TextBox3 DataSource adoBooks
TextBox4 Name txtPubID
TextBox4 DataField  PubID
TextBox4 DataSource adoBooks
TextBox5 Name txtSubject
TextBox5 DataField  Subject
TextBox5 DataSource adoBooks
Command Button1 Name  cmdSave
Command Button1 Caption &Save
Command Button2 Name  cmdAdd
Command Button2 Caption &Add
Command Button3 Name  cmdDelete
Command Button3 Caption &Delete
Command Button4 Name  cmdCancel
Command Button4 Caption &Cancel
Command Button5 Name  cmdPrev
Command Button5 Caption &<
Command Button6 Name  cmdNext
Command Button6 Caption &>
Command Button7 Name  cmdExit
Command Button7 Caption E&xit

Animation-Part I
 

     Animation is always an interesting and exciting part of programming. Although visual basic is not designed to handle advance animations, you can still create some interesting animated effects if you put  in some hard thinking. There are many ways to create animated effects in VB6, but for a start we will focus on some easy methods.

The simplest way to create animation is to set the VISIBLE property of a group of images or pictures or even texts and labels to true or false by triggering a set of events such as clicking a button. Let's examine the following example:

This is a program that create the illusion of moving the jet plane in four directions, North, South ,East, West. In order to do this, insert five images of the same picture into the form. Set the visible property of the image in the center to be true while the rest set to false. On start-up, a user will only be able to see the image in the center. Next, insert four command buttons into the form and change the labels to Move North, Move East, Move West and Move South respectively. Double click on the move north button and key in the following procedure:

Sub Command1_click( )

Image1.Visible = False
Image3.Visible = True
Image2.Visible = False
Image4.Visible = False
Image5.Visible = False

End Sub

By clicking on the move north button, image1 and other images except image 3 displayed. This will give an illusion that the jet plane has moved north. Key in similar procedures by double clicking other command buttons. You can also insert an addition command button and label it as Reset and key in the following codes:

Image1.Visible = True
Image3.Visible = False
Image2.Visible = False
Image4.Visible = False
Image5.Visible = False

Clicking on the reset button will make the image in the center visible again while other images become invisible, this will give the false impression that the jet plane has move back to the original position.


You can also issue the commands using a textbox, this idea actually came from my son Liew Xun (10 years old). His program is shown below:

Private Sub Command1_Click()

If Text1.Text = "n" Then
Image1.Visible = False
Image3.Visible = True
Image2.Visible = False
Image4.Visible = False
Image5.Visible = False


ElseIf Text1.Text = "e" Then
Image1.Visible = False
Image4.Visible = True
Image2.Visible = False
Image3.Visible = False
Image5.Visible = False


ElseIf Text1.Text = "w" Then
Image1.Visible = False
Image3.Visible = False
Image2.Visible = False
Image4.Visible = False
Image5.Visible = True


ElseIf Text1.Text = "s" Then
Image1.Visible = False
Image3.Visible = False
Image2.Visible = True
Image4.Visible = False
Image5.Visible = False
End If


Another simple way to simulate animation in VB6 is by using the Left and Top properties of an object. Image.Left give the distance of the image in twips from the left border of the screen, and Image.Top give the distance of the image in twips from the top border of the screen, where 1 twip is equivalent to 1/1440 inch. Using a statement such as Image.Left-100 will move the image 100 twips to the left, Image.Left+100 will move the image 100 twip away from the left(or 100 twips to the right), Image.Top-100 will move the image 100 twips to the top and Image.Top+100 will move the image 100 twips away from the top border (or 100 twips down).Below is a program that can move an object up, down. left, and right every time you click on a relevant command button.
 

The Codes

Private Sub Command1_Click()
Image1.Top = Image1.Top + 100
End Sub

Private Sub Command2_Click()
Image1.Top = Image1.Top - 100
End Sub

Private Sub Command3_Click()
Image1.Left = Image1.Left + 100
End Sub

Private Sub Command4_Click()
Image1.Left = Image1.Left - 100
End Sub
 

The fourth example let user magnify and diminish an object by changing the height and width properties of an object. It is quite similar to the previous example. The statements  Image1.Height = Image1.Height + 100  and Image1.Width = Image1.Width + 100 will increase the height and the width of an object by 100 twips each time a user click on the relevant command button. On the other hand, The statements  Image1.Height = Image1.Height - 100  and Image1.Width = Image1.Width -100 will decrease the height and the width of an object by 100 twips each time a user click on the relevant command button


The Codes

Private Sub Command1_Click()
Image1.Height = Image1.Height + 100
Image1.Width = Image1.Width + 100
End Sub

Private Sub Command2_Click()

Image1.Height = Image1.Height - 100
Image1.Width = Image1.Width - 100

End Sub

You can try to combine both programs above and make an object move and increase or decrease in size each time a user click a command button.


Animation using timer

All preceding examples of animation that you have learn in lesson 23 and lesson 24 only involve manual animation, which means you need to keep on clicking a certain command button or pressing a key to make an object animate. In order to make it move automatically, you need to use a timer. The first step in creating automatic animation is to drag the timer from the toolbox into the form and set its interval to a certain value other than 0. A value of 1 is 1 milliseconds which means a value of 1000 represents 1 second. The value of the timer interval will determine the speed on an animation.

In the following example, I use a very simple technique to show animation by using the properties Visible=False and Visible=true to show and hide two images alternately. When you click on the program, you should see the following animation.

Next example shows a complete cycle of a motion such as the butterfly flapping its wing. Previous examples show only manual animation while this example will display an automatic animation once you start the program or by clicking a command button. Similar to the example under lesson 24.2, you need to insert a group of eight images of a butterfly flapping its wings at different stages. Next, insert a timer into the form and set the interval to 10 or any value you like. Remember to make image1 visible while other images invisible at start-up. Finally, insert a command button, rename its caption  as Animate and key in the following statements by double clicking on this button. Bear in mind that you should enter the statements for hiding and showing the images under the timer1_timer subroutine otherwise the animation would work. Clicking on the animate button make timer start ticking and the event will run after every interval of 10 milliseconds or whatever interval you have set at design time. In future lesson, I will show you how to adjust the interval at runtime by using a slider bar or a scroll bar. When you run the program, you should see the following animation:

The Codes

Private Sub Timer1_Timer()

If Image1.Visible = True Then
Image1.Visible = False
Image2.Visible = True
ElseIf Image2.Visible = True Then
Image2.Visible = False
Image1.Visible = True
End If

End Sub


Next example shows a complete cycle of a motion such as the butterfly flapping its wing. Previous examples show only manual animation while this example will display an automatic animation once you start the program or by clicking a command button. Similar to the example under lesson 24.2, you need to insert a group of eight images of a butterfly flapping its wings at different stages. Next, insert a timer into the form and set the interval to 10 or any value you like. Remember to make image1 visible while other images invisible at start-up. Finally, insert a command button, rename its caption  as Animate and key in the following statements by double clicking on this button. Bear in mind that you should enter the statements for hiding and showing the images under the timer1_timer subroutine otherwise the animation would work. Clicking on the animate button make timer start ticking and the event will run after every interval of 10 milliseconds or whatever interval you have set at design time. In future lesson, I will show you how to adjust the interval at runtime by using a slider bar or a scroll bar. When you run the program, you should see the following animation:


Private Sub Form_Load()
Image1.Visible = True
x = 0
End Sub

Private Sub Command1_Click()
Timer1.Enabled = True
End Sub

Private Sub Timer1_Timer()
If Image1.Visible = True Then
Image1.Visible = False
Image2.Visible = True

ElseIf Image2.Visible = True Then
Image2.Visible = False
Image3.Visible = True

ElseIf Image3.Visible = True Then
Image3.Visible = False
Image4.Visible = True
ElseIf Image4.Visible = True Then
Image4.Visible = False
Image5.Visible = True
ElseIf Image5.Visible = True Then
Image5.Visible = False
Image6.Visible = True
ElseIf Image6.Visible = True Then
Image6.Visible = False
Image7.Visible = True
ElseIf Image7.Visible = True Then
Image7.Visible = False
Image8.Visible = True
ElseIf Image8.Visible = True Then
Image8.Visible = False
Image1.Visible = True
End If
End Sub


Enter supporting content here