|
MsgBox ( ) Function
The objective of MsgBox is to produce a pop-up message box and prompt the user to
click on a command button before he /she can continues. This message box format is as follows:
yourMsg=MsgBox(Prompt, Style
Value, Title)
The first argument, Prompt, will display the message in the message box. The
Style Value will determine what type of command buttons appear on the message box, please refer Table 10.1 for types
of command button displayed. The Title argument will display the title of the message board.
Table 10.1: Style Values
|
Style Value |
Named Constant |
Buttons Displayed |
|
0 |
vbOkOnly |
Ok button |
|
1 |
vbOkCancel |
Ok and Cancel buttons |
|
2 |
vbAbortRetryIgnore |
Abort, Retry and Ignore buttons. |
|
3 |
vbYesNoCancel |
Yes, No and Cancel buttons |
|
4 |
vbYesNo |
Yes and No buttons |
|
5 |
vbRetryCancel |
Retry and Cancel buttons |
We can use named constant in place of integers for the second argument to make the
programs more readable. In fact, VB6 will automatically shows up a list of names constant where you can select one of
them.
example: yourMsg=MsgBox( "Click OK to Proceed", 1, "Startup Menu")
and yourMsg=Msg("Click
OK to Proceed". vbOkCancel,"Startup Menu")
are the same.
yourMsg is a variable that holds values that are returned by the MsgBox (
) function. The values are determined by the type of buttons being clicked by the users. It has to be declared as Integer
data type in the procedure or in the general declaration section. Table 10.2 shows the values, the corresponding named constant
and buttons.
Table 10.2 : Return Values and Command Buttons
|
Value |
Named Constant |
Button Clicked |
|
1 |
vbOk |
Ok button |
|
2 |
vbCancel |
Cancel button |
|
3 |
vbAbort |
Abort button |
|
4 |
vbRetry |
Retry button |
|
5 |
vbIgnore |
Ignore button |
|
6 |
vbYes |
Yes button |
|
7 |
vbNo |
No button |
Example
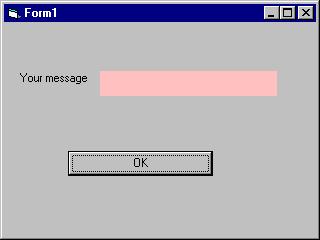
i. The Interface:
You
draw three command buttons and a label as shown in Figure 10.1
Figure 10.1

ii. The procedure for the test
button:
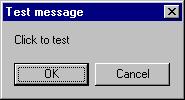
Private Sub Test_Click()
Dim testmsg As Integer
testmsg = MsgBox("Click
to test", 1, "Test message")
If testmsg = 1 Then
Display.Caption = "Testing Successful"
Else
Display.Caption
= "Testing fail"
End If
End Sub
When a user click
on the test button, the image like the one shown in Figure 10.2 will appear. As the user click on the OK button, the message
"Testing successful" will be displayed and when he/she clicks on the Cancel button, the message "Testing fail" will be displayed.
Figure 10.2
To make the message box looks more sophisticated, you can add an icon besides the message.
There are four types of icons available in VB as shown in Table 10.3
Table 10.3
Example 10.2
You draw the same Interface as in example 10.1 but modify
the codes as follows:
Private Sub test2_Click()
Dim testMsg2 As Integer
testMsg2 = MsgBox("Click to Test", vbYesNoCancel + vbExclamation, "Test Message")
If testMsg2 = 6 Then
display2.Caption
= "Testing successful"
ElseIf testMsg2 = 7 Then
display2.Caption = "Are you sure?"
Else
display2.Caption =
"Testing fail"
End If
End Sub
In this example, the following message box will be displayed:
Figure 10.3

10.2 The InputBox( ) Function
An InputBox( ) function will display a message box where the
user can enter a value or a message in the form of text. The format is
myMessage=InputBox(Prompt, Title, default_text, x-position, y-position)
myMessage is a variant data type but typically it is declared as string,
which accept the message input by the users. The arguments are explained as follows:
- Prompt - The message displayed
normally as a question asked.
- Title
- The title of the Input Box.
- default-text - The default text that appears in the input
field where users can use it as his intended input or he may change to the message he wish to key in.
- x-position and y-position - the position or the coordinate of
the input box.
Example 10.3
i. The Interface
Figure 10.4
|
ii. The procedure for the OK button
Private Sub OK_Click()
Dim userMsg As String
userMsg = InputBox("What
is your message?", "Message Entry Form", "Enter your messge here", 500, 700)
If userMsg <> "" Then
message.Caption
= userMsg
Else
message.Caption = "No Message"
End If
End Sub
When a user click the OK button, the input box as shown in Figure 10.5 will
appear. After user entering the message and click OK, the message will be displayed on the caption, if he click Cancel, "No
message" will be displayed.

|
|
 |
|
| Creating Your Own Functions
The general format of a function is as follows:
Public Function functionName (Arg As dataType,..........) As dataType
or
Private Function functionName (Arg As dataType,..........) As dataType
* Public indicates that the function is applicable to the whole program
and
Private indicates that the function is only applicable to a certain module or procedure. |
|
|
Example 11.1
In this example,
a user can calculate future value of a certain amount of money he has today based
on the interest
rate and the number of years from now supposing he will invest this amount of money
somewhere
.The calculation is based on the compound interest rate.
|
Public Function FV(PV As Variant, i As Variant, n
As Variant) As Variant
'Formula to calculate Future Value(FV)
'PV denotes Present Value
FV = PV * (1 + i / 100)
^ n
End Function
Private Sub compute_Click()
'This procedure will
calculate Future Value
Dim FutureVal As Variant
Dim PresentVal As Variant
Dim interest As Variant
Dim period
As Variant
PresentVal = PV.Text
interest = rate.Text
period = years.Text
FutureVal = FV(PresentVal, interest, period)
MsgBox
("The Future Value is " & FutureVal)
End Sub |
Example 11.2
The following program will automatically compute examination grades based
on the marks that a student obtained.
|
Public Function grade(mark As Variant)
As String
Select Case mark
Case Is >=
80
grade = "A"
Case Is >= 70
grade = "B"
Case Is >= 60
grade = "C"
Case Is >= 50
grade
= "D"
Case Is >= 40
grade = "E"
Case Else
grade = "F"
End Select
End Function
Private Sub compute_Click()
grading.Caption = grade(mark)
Creating Multimedia Applications
You can create various multimedia applications in VB that could play audio CD, audiofiles, VCD
, video files and etc.
To be able to play multimedia files or multimedia devices, you have to insert Microsoft Multimedia
Control into your VB applications
that you are going to create. However, Microsoft Multimedia Control is not normally included in
the startup toolbox, therefore you need
to add the MM control by pressing Ctrl+T and select it from the components dialog box that is displayed.
15.1
Creating a CD player
(a) The Interface.
¡¡
¡¡
First of all, you place a Multimedia control into your form and rename it as any name of your choice.
Here I use myCD to replace the default name MMControl1. Next, you can put two labels on your form, change caption of the
left label to Track and rename the one on the right to trackNum and make its caption invisible(this lable is to display
CD track numbers at runtime.). Finally, put five command buttons in your form and name them as Play, Next, Previous, Stop
and Exit. You can also choose to make the MM Control visible or invisible at runtime. If you choose to make it visible,you
could play the CD using the buttons available on the control itself or you can click on the buttons at the bottom that are
created by you.
(b) The Code
Private Sub Form_Load()
¡®To position the page at the center
Left = (Screen.Width ¨C Width) \ 2
Top = (Screen.Height ¨C Height) \ 2
¡®Open the CD
myCD.Command = ¡°Open¡±
End Sub
Private Sub myCD_StatusUpdate()
¡®Update the track number
trackNum.Caption = myCD.Track
End Sub
Private Sub Next_Click()
myCD.Command = ¡°Next¡±
End Sub
Private Sub Play_Click()
myCD.Command = ¡°Play¡±
End Sub
Private Sub Previous_Click()
myCD.Command = ¡°Prev¡±
End Sub
Private Sub Stop_Click()
myCD.Command = ¡°Stop¡±
End Sub
Private Sub Exit_Click()
End
End Sub
|
|
|
In previous lesson, we have programmed
a CD player. Now, with some modifications, we will transform the CD player into an audio file player. This player will be
created in such a way that it could search for wave and midi files in your drives and play them.
In this project, you need to insert a ComboBox, a DriveListBox, a DirListBox,
a TextBox and a FileListBox into your form.I Shall briefly discuss the function of each of the above controls. Besides, you
must also insert Microsoft Multimedia Control(MMControl) in your form , you may make it visible or invisible. In my program,
I choose to make it invisible so that I could use the command buttons created to control the player.
-
ComboBox- to display and enable selection of different type
of files.
-
DriveListBox- to allow selection selection of different drives
available on your PC.
-
DirListBox - To display directories
-
TextBox - To display selected files
-
FileListBox- To display files that are available
Relevant codes must be written to coordinate all the above controls
so that the application can work properly. The program should flow in the following logical way:
Step 1: User choose the type of files he wants to play.
Step2:User selects the drive that might contains the relevant audio
files.
Step 3:User looks into directories and subdirectories for the files
specified in step1. The files should be displayed in the FileListBox.
Step 4: User selects the files from the FileListBox and click
the Play button.
Step 5: User click on the Stop to stop playing and Exit button to end
the application.
The Interface

The Code
Private Sub Combo1_Change()
' to determine file type
If ListIndex
= 0 Then
File1.Pattern = ("*.wav")
ElseIf ListIndex = 1 Then
File1.Pattern = ("*.mid")
Else
Fiel1.Pattern =
("*.*")
End If
End Sub
Private Sub Dir1_Change()
'To
change directories and subdirectories(or folders and subfolders)
File1.Path
= Dir1.Path
If Combo1.ListIndex = 0 Then
File1.Pattern = ("*.wav")
ElseIf Combo1.ListIndex = 1 Then
File1.Pattern
= ("*.mid")
Else
File1.Pattern = ("*.*")
End If
End Sub
Private
Sub Drive1_Change()
'To
change drives
Dir1.Path
= Drive1.Drive
End
Sub
Private Sub File1_Click()
If Combo1.ListIndex = 0 Then
File1.Pattern = ("*.wav")
ElseIf Combo1.ListIndex
= 1 Then
File1.Pattern = ("*.mid")
Else
File1.Pattern = ("*.*")
End If
If Right(File1.Path, 1) <>
"\" Then
filenam = File1.Path + "\" + File1.FileName
Else
filenam = File1.Path + File1.FileName
End If
Text1.Text
= filenam
End Sub
Private Sub Form_Load()
'To
center the Audioplayer startup page
Left
= (Screen.Width - Width) \ 2
Top = (Screen.Height - Height) \ 2
Combo1.Text = "*.wav"
Combo1.AddItem "*.wav"
Combo1.AddItem
"*.mid"
Combo1.AddItem "All files"
End Sub
Private Sub play_Click()
'To
play WaveAudio file or Midi File
Command2_Click
If
Combo1.ListIndex = 0 Then
AudioPlayer.DeviceType = "WaveAudio"
ElseIf Combo1.ListIndex = 1 Then
AudioPlayer.DeviceType
= "Sequencer"
End If
AudioPlayer.FileName = Text1.Text
AudioPlayer.Command = "Open"
AudioPlayer.Command = "Play"
End
Sub
Private Sub stop_Click()
If AudioPlayer.Mode = 524 Then Exit Sub
If AudioPlayer.Mode <> 525 Then
AudioPlayer.Wait
= True
AudioPlayer.Command = "Stop"
End If
AudioPlayer.Wait = True
AudioPlayer.Command = "Close"
End Sub
In lesson 16, we have created an audio player. Now, with some modifications, we will transform
the audio player into a picture viewer. This player will be created in such a way that it could search for all types of graphics
your drives and displays them.
Similar to the previous project, in this project, you need to insert a ComboBox, a DriveListBox,
a DirListBox, a TextBox and a FileListBox into your form. I Shall briefly explain again the function of each of the above
controls.
- ComboBox- to display and enable selection of different type of files.
- DriveListBox- to allow selection selection of different drives available on your PC.
- DirListBox - To display directories
- TextBox - To display selected files
- FileListBox- To display files that are available
Relevant codes must be written to coordinate all the above controls so that the application can
work properly. The program should flow in the following logical way:
Step 1: User choose the type of files he wants to play.
Step2:User selects the drive that might contains the relevant graphic files.
Step 3:User looks into directories and subdirectories for the files specified in step1. The files
should be displayed in the FileListBox.
Step 4: User selects the files from the FileListBox and click the Show button.
Step 5: User click on Exit button to end the application.

The Code
Private Sub Form_Load()
Left = (Screen.Width - Width) \ 2
Top = (Screen.Height - Height)
\ 2
Combo1.Text = "All graphic files"
Combo1.AddItem "All graphic files"
Combo1.AddItem "All
files"
End Sub
¡¡
Private Sub Combo1_Change()
If ListIndex = 0 Then
File1.Pattern = ("*.bmp;*.wmf;*.jpg;*.gif")
Else
Fiel1.Pattern
= ("*.*")
End If
End Sub
Private Sub Dir1_Change()
File1.Path = Dir1.Path
File1.Pattern
= ("*.bmp;*.wmf;*.jpg;*.gif")
End Sub
Private Sub Drive1_Change()
Dir1.Path = Drive1.Drive
End Sub
Private Sub File1_Click()
If Combo1.ListIndex = 0 Then
File1.Pattern = ("*.bmp;*.wmf;*.jpg;*.gif")
Else
File1.Pattern
= ("*.*")
End If
If Right(File1.Path, 1) <> "\" Then
filenam = File1.Path + "\" + File1.FileName
Else
filenam
= File1.Path + File1.FileName
End If
Text1.Text = filenam
End Sub
Private Sub play_Click()
MMPlayer.FileName
= Text1.Text
End Sub
Private Sub show_Click()
If Right(File1.Path, 1) <> "\" Then
filenam
= File1.Path + "\" + File1.FileName
Else
filenam = File1.Path + File1.FileName
End If
picture1.Picture = LoadPicture(filenam)
End
Sub
|
|
|
|
In lesson 16, we have created an audio player. Now, with some modifications,
we will transform the audio player into a multimedia player that could play all kinds of movie files besides audio files.
This player will be created in such a way that it could search for all types of graphics your drives and play them.
In this project, you need to insert a ComboBox, a DriveListBox, a DirListBox,
a TextBox ,a FileListBox and a picture box (for playing movie) into your form. I Shall briefly
discuss the function of each of the above controls. Besides, you must also insert Microsoft Multimedia Control(MMControl)
in your form , you may make it visible or invisible. In my program, I choose to make it invisible so that I could use the
command buttons created to control the player.
-
ComboBox- to display and enable selection of different type
of files.
-
DriveListBox- to allow selection selection of different drives
available on your PC.
-
DirListBox - To display directories
-
TextBox - To display selected files
-
FileListBox- To display files that are available
Relevant codes must be written to coordinate all the above controls
so that the application can work properly. The program should flow in the following logical way:
Step 1: User choose the type of files he wants to play.
Step2:User selects the drive that might contains the relevant audio
files.
Step 3:User looks into directories and subdirectories for the files
specified in step1. The files should be displayed in the FileListBox.
Step 4: User selects the files from the FileListBox and click
the Play button.
Step 5: User click on the Stop to stop playing and Exit button to end
the application
The
Codes
Private Sub
Form_Load()
Left = (Screen.Width - Width) \ 2
Top = (Screen.Height - Height) \ 2
Combo1.Text = "*.wav"
Combo1.AddItem
"*.wav"
Combo1.AddItem "*.mid"
Combo1.AddItem "*.avi;*.mpg"
Combo1.AddItem "All files"
End Sub
Private Sub
Combo1_Change()
If ListIndex = 0 Then
File1.Pattern = ("*.wav")
ElseIf ListIndex = 1 Then
File1.Pattern = ("*.mid")
ElseIf
ListIndex = 2 Then
File1.Pattern = ("*.avi;*.mpg")
Else
Fiel1.Pattern = ("*.*")
End If
End Sub
¡¡
Private
Sub Dir1_Change()
File1.Path = Dir1.Path
If Combo1.ListIndex = 0 Then
File1.Pattern = ("*.wav")
ElseIf Combo1.ListIndex
= 1 Then
File1.Pattern = ("*.mid")
ElseIf Combo1.ListIndex = 2 Then
File1.Pattern = ("*.avi;*.mpg")
Else
File1.Pattern
= ("*.*")
End If
End Sub
Private
Sub Drive1_Change()
Dir1.Path = Drive1.Drive
End Sub
Private Sub File1_Click()
If Combo1.ListIndex = 0
Then
File1.Pattern = ("*.wav")
ElseIf Combo1.ListIndex = 1 Then
File1.Pattern = ("*.mid")
ElseIf Combo1.ListIndex
= 2 Then
File1.Pattern = ("*.avi;*.mpg")
Else
File1.Pattern = ("*.*")
End If
If Right(File1.Path, 1) <>
"\" Then
filenam = File1.Path + "\" + File1.FileName
Else
filenam = File1.Path + File1.FileName
End If
Text1.Text
= filenam
End Sub
Private Sub play_Click()
MMPlayer.FileName = Text1.Text
MMPlayer.Command = "Open"
MMPlayer.Command
= "Play"
MMPlayer.hWndDisplay = videoscreen.hWnd
End Sub
Private Sub stop_Click()
If MMPlayer.Mode = 524
Then Exit Sub
If MMPlayer.Mode <> 525 Then
MMPlayer.Wait = True
MMPlayer.Command = "Stop"
End If
MMPlayer.Wait
= True
MMPlayer.Command = "Close"
End Sub
Creating database applications in VB
Visual basic allows us to manage databases
created with different database programs such as MS Access, Dbase, Paradox and etc. In this lesson, we are not dealing with
how to create database files but we will see how we can access database files in the VB environment.
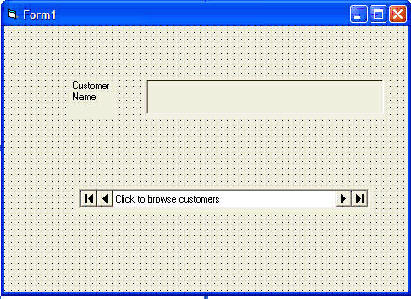
In the following example, we will create a
simple database application which enable one to browse customers' names. To create this application, insert the
data control into the new form. Place the data control somewhere at the bottom of the form. Name the data control as data_navigator.
To be able to use the data control, we need to connect it to any database. We can create a database file using any database
application but I suggest we use the database files that come with VB6. Let select NWIND.MDB as our database file. To
connect the data control to this database, double-click the DatabaseName property in the properties window and select the
above file, i.e NWIND.MDB. Next, double-click on the RecordSource property to select the customers table from the database.
You can also change the caption of the data control to anything but I use "Click to browse Customers" here. After that, we
will place a label and change its caption to Customer Name. Last but not least, insert another label and name it as
cus_name and leave the label empty as customers' names will appear here when we click the arrows on the data control. We need
to bind this label to the data control for the application to work. To do this, open the label's DataSource and select data_navigator
that will appear automatically. One more thing that we need to do is to bind the label to the correct field so that data in
this field will appear on this label. To do this, open the DataField property and select ContactName. Now, press F5 and run
the program. You should be able to browse all the customers' names by clicking the arrows on the data control.
The Design Interface.
The Runtime Interface

You can also add other fields using exactly the same method. For example,
you can add adress, City and telephone number to the database browser.

|
|
|